Grid Battle Engine


To help game developers build the battle system of their dreams, I’ve developed the Grid Battle Engine, which is a suite of plugins that allow you to add new mechanics to your game.
The Grid Battle Engine allows you to turn your default battle system, into a grid battle system!
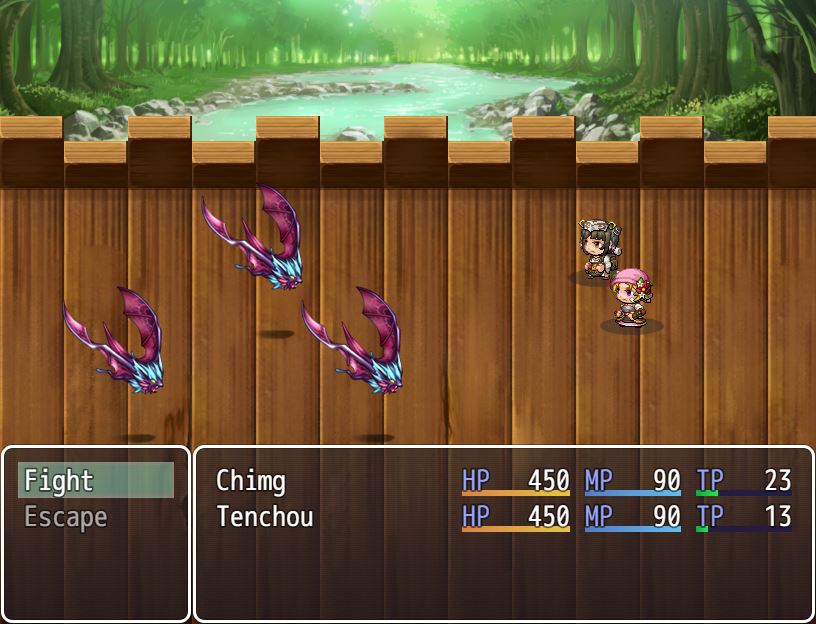
First you start with your default battle system like this
And then you add grid battle on top, to turn it into this!
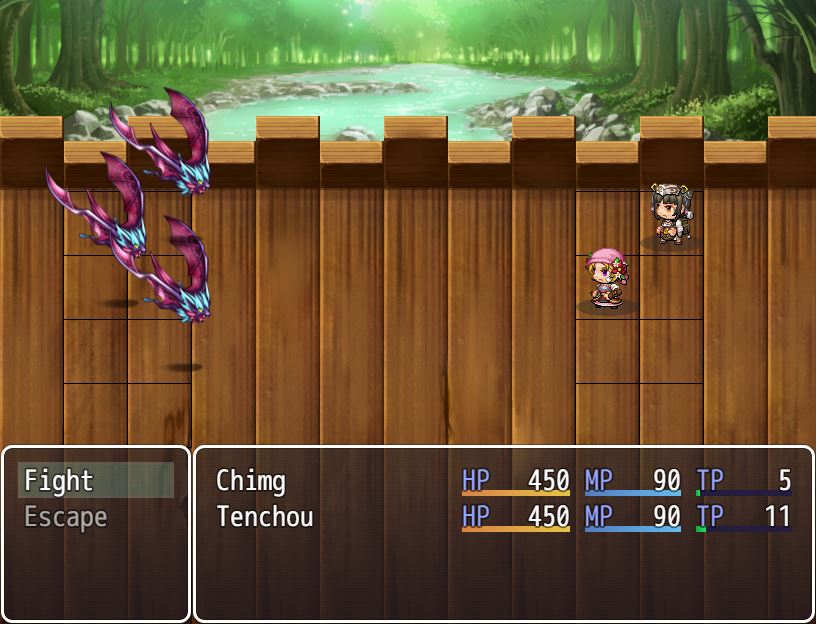
It’s basically the default battle system that you’re familiar with, except we add a couple things to it
- One or more grids.
- Battler positions on each grid.
So what’s so special about grid battle? Isn’t it just changing where the sprites appear?
The grid battle engine itself allows you to create and manage grids. You can then install add-on plugins that will provide additional mechanics depending on what kind of battle system you want to make.
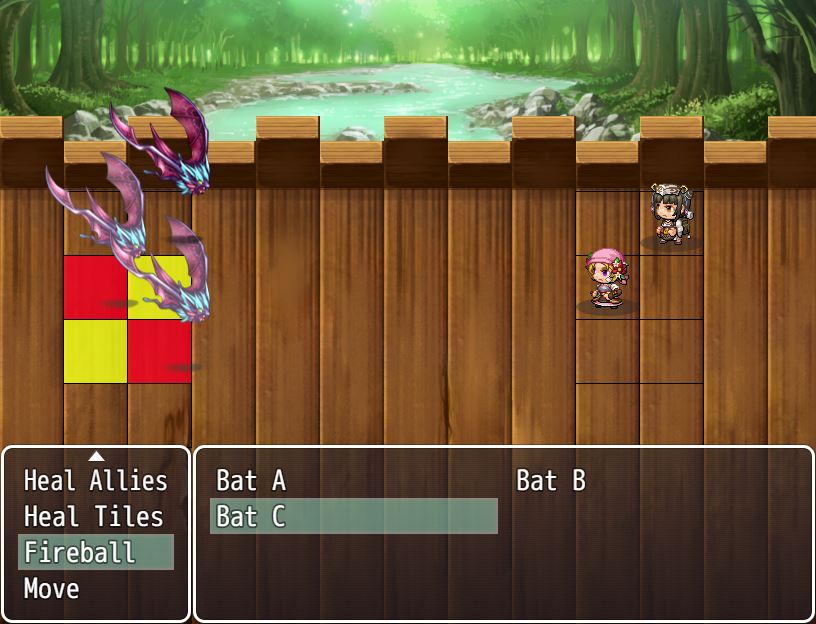
For example, one of the add-ons allows you to create Area of Effect targeting, which allows you to create your own area of effects and then assign them to your item or skills so that you can target multiple battlers with a single action!
With the grid battle engine, you can add a lot of new functionality to your battle system without having to change the rest of your game. You can also use different types of battle systems in the same game, for example if you wanted to create some mini-game arena challenges, or have a map-based battle for certain parts of the game.
The possibilities are endless.
Download
This plugin can be used in both MV and MZ. Instructions are the same for both.
A quick getting started guide can be found here:
https://himeworks.itch.io/grid-battle-system/devlog/172117/initial-release
Patches
There include fixes and other things that are separate from the plugin, or I haven’t merged it with the plugin yet (for example, bug fixes)
Main Patch file: download here (last updated 2020-08-23)
Contains fixes and other bug reports. You should install this under the other grid plugins.
Usage
The plugin parameters come with a few options

The Default Grid is the name of the grid config that the game starts with. This can be changed later on using script calls.
Show Grid simply lets you choose whether the grid outline will be displayed. You can turn this off if you don’t want to see it.
The Grid Configs is where you set up your grids.
Managing Battle Grids
The grid battle engine works with two concepts
- Battle Grid Config
- Battle Grid Data
Battle Grid Config
The config describes the entire battlefield. It has a name that you’ll use to reference this config, and a list of grids. In the plugin parameters, you can set up some default configs that will be used in your project.
You can click on an existing config to edit or, or click on an empty row to create a new config. I have provided two sample grid setups for you already that you can explore.

Start by filling out the name for the config, and then click on Grids to set up the grids for the config.
Battle Grid Data
The grid data itself describes the properties of the grid. Here’s how it looks in the plugin parameters. You can have one or more grids per config, so you can just click on an existing grid to modify it, or click on an empty row to create a new grid.
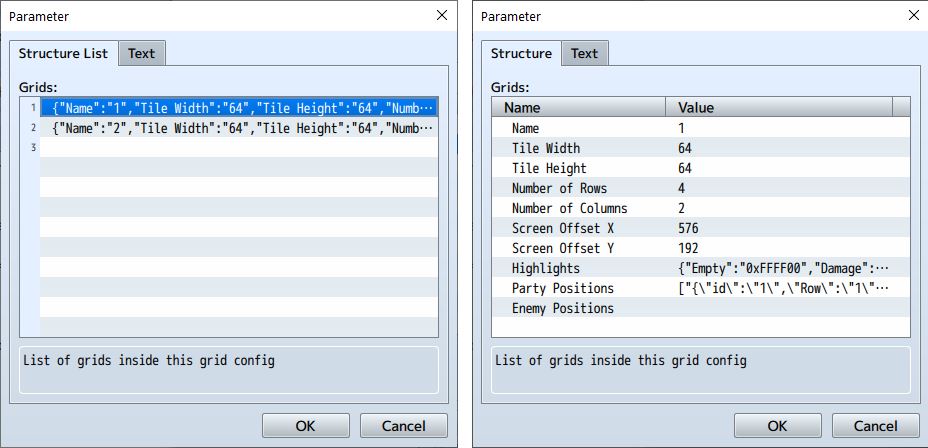
Let’s go through each property
- The Tile Width of each tile in the grid, in pixels
- The Tile Height of each tile in the grid, in pixels
- Number of Rows in your grid
- Number of Columns in your grid
- Screen Offset X is the number of pixels from the left of the screen
- Screen Offset Y is the number of pixels from the top of the screen
The highlights are the colors that will be displayed for the tiles under specific circumstances, usually for target selection.

- Empty highlight is when there’s no target (eg: empty tile)
- Damage highlight is when the skill has “damage” type
- Recover highlight is when the skill has “recover” type
- None highlight is when the tile isn’t highlighted
For party positions, you can set up the default positions for actors in the party. You can add more entries if your game supports more actors in the party. The ID is the order the actor appears in the party, so 1 is the leader, 2 is the first follower, and so on.
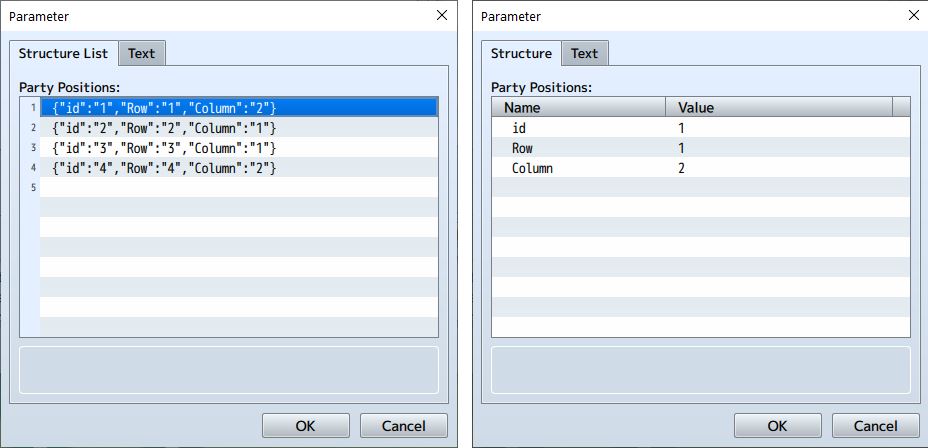
You should create as many rows as needed based on the max number of party members, otherwise the game will crash since no position was able to assigned.
For Enemy Positions it’s the same set up, except it’s based on enemy order in the troop. The order by default is the order that they’re added to the troop, but if you have other plugins this might not be the case.
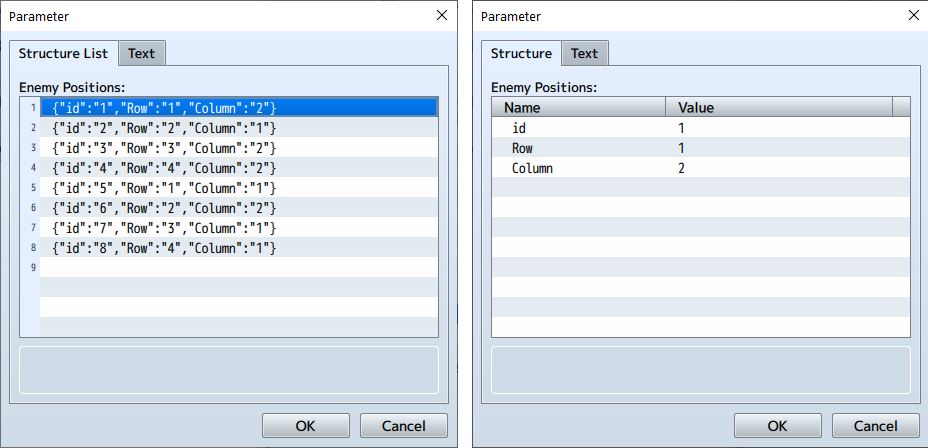
Again, you should make sure every possible troop enemy has a position.
Multi Grid Positions
Each grid can have their own party and enemy positions. This means that you can basically move actors and enemies to different grids. The default “Two Grid” config comes with two grids, one with 4 party positions, the other with 8 enemy positions.
You could extend this to as many grids as you want. For example, if you wanted a three grid “pincer attack” system, you can set up a config with three grids, set the screen offset of each grid appropriately, then place enemies 1 to 4 on the left grid, actors on the middle grid, and enemies 5 to 8 on the right grid. This is how it should look:


what are these comments
I was thinking the same lol, something about isreali people and a bunch of scams
pop over to this website https://threnivarock.com
look here https://visordjakke.com/
published here https://interior-sketcher.com
check https://jaxx-wallet.com/
Homepage https://shopvitality.space/cameroon/cardiovascular-system/st-heart/
try this
bread wallet
Beirut, Lebanon
CNN
—
A deadly Israeli airstrike on Hezbollah’s stronghold in southern Beirut on Friday has left over a dozen people dead, including a high-ranking Hezbollah commander, sharply escalating the conflict between the two sides and raising fears of all-out war.
Senior Hezbollah commander Ibrahim Aqil, part of Hezbollah’s elite Radwan Force, was assassinated along with “about 10” other commanders, Israel Defense Forces (IDF) spokesperson Daniel Hagari said, accusing them of planning to raid and occupy communities in Galilee in northern Israel.
Hezbollah confirmed Aqil’s death on Friday, saying he was killed “following a treacherous Israeli assassination operation on 09/20/2024 in the southern suburbs of Beirut.”
According to Hagari, the targeted commanders were “underground underneath a residential building in the heart of the Dahiyeh neighborhood, using civilians as a human shield” at the time of the attack.
Lebanon’s health ministry said at least 14 people were killed and 66 others injured in the airstrike, which leveled a multistory building in a densely populated neighborhood.
Aqil had a $7 million bounty on his head from the United States for his suspected involvement in the 1983 strike on the US Embassy in Beirut, which killed 63 people, as well as the bombing of the Beirut Marine barracks, which killed 241 US personnel later that year.
A CNN team on the ground in Beirut saw a frantic effort to rescue people from underneath the rubble and rush the wounded to hospital. Witnesses said nearby buildings shook for nearly half an hour after the strike, which the IDF said it had carried out at around 4 p.m. local time.
A week of surprise attacks
Friday’s strike marked the fourth consecutive day of surprise attacks on Beirut and other sites across the country, even as Israeli forces continued deadly strikes and operations in Gaza and the occupied West Bank.
The first major attack against Hezbollah this week came Tuesday afternoon when pagers belonging to the militant groups’ members exploded near-simultaneously. The pagers had been used by Hezbollah to communicate after the group’s leader, Hassan Nasrallah, encouraged members to switch to low-tech devices to prevent more of them from being assassinated.
Almost exactly 24 hours later, Lebanon was rocked by a second wave of explosions, after Hezbollah walkie-talkies detonated in Beirut and the south of the country on Wednesday.
At least 37 people were killed, including some children, and more than 3,000 were injured in the twin attacks.
In a United Nations Security Council meeting on Friday, UN human rights chief Volker Turk on Friday warned that the detonation of communication devices could violate international human rights law.
Lebanese Foreign Minister Abdallah Bou Habib and Israeli Ambassador to the UN Danny Danon clashed at the heated meeting, with Bou Habib calling on the council to condemn Israel’s actions and Danon slamming the Lebanese envoy for not mentioning Hezbollah.
A nuclear fusion power plant prototype is already being built outside Boston. How long until unlimited clean energy is real?
гей порно молодые
In an unassuming industrial park 30 miles outside Boston, engineers are building a futuristic machine to replicate the energy of the stars. If all goes to plan, it could be the key to producing virtually unlimited, clean electricity in the United States in about a decade.
The donut-shaped machine Commonwealth Fusion Systems is assembling to generate this energy is simultaneously the hottest and coldest place in the entire solar system, according to the scientists who are building it.
It is inside that extreme environment in the so-called tokamak that they smash atoms together in 100-million-degree plasma. The nuclear fusion reaction is surrounded by a magnetic field more than 400,000 times more powerful than the Earth’s and chilled with cryogenic gases close to absolute zero.
The fusion reaction — forcing two atoms to merge — is what creates the energy of the sun. It is the exact opposite of what the world knows now as “nuclear power” — a fission reaction that splits atoms.
Nuclear fusion has far greater energy potential, with none of the safety concerns around radioactive waste.
SPARC is the tokamak Commonwealth says could forever change how the world gets its energy, generating 10 million times more than coal or natural gas while producing no planet-warming pollution. Fuel for fusion is abundant, derived from deuterium, found in seawater, and tritium extracted from lithium. And unlike nuclear fission, there is no atomic waste involved.
The biggest hurdle is building a machine powerful and precise enough to harness the molten, hard-to-tame plasma, while also overcoming the net-energy issue – getting more energy out than you put into it.
“Basically, what everybody expects is when we build the next machine, we expect it to be a net-energy machine,” said Andrew Holland, CEO of the Fusion Industry Association, a trade group representing fusion companies around the globe. “The question is, how fast can you build that machine?”
Commonwealth’s timeline is audacious: With over $2 billion raised in private capital, its goal is to build the world’s first fusion-fueled power plant by the early 2030s in Virginia.
“It’s like a race with the planet,” said Brandon Sorbom, Commonwealth’s chief science officer. Commonwealth is racing to find a solution for global warming, Sorbom said, but it’s also trying to keep up with new power-hungry technologies like artificial intelligence. “This factory here is a 24/7 factory,” he said. “We’re acutely aware of it every minute of every hour of every day.”
visit this site keplr wallet
Scientists redid an experiment that showed how life on Earth could have started. They found a new possibility
safepal wallet
In the 1931 movie “Frankenstein,” Dr. Henry Frankenstein howling his triumph was an electrifying moment in more ways than one. As massive bolts of lightning and energy crackled, Frankenstein’s monster stirred on a laboratory table, its corpse brought to life by the power of electricity.
Electrical energy may also have sparked the beginnings of life on Earth billions of years ago, though with a bit less scenery-chewing than that classic film scene.
Earth is around 4.5 billion years old, and the oldest direct fossil evidence of ancient life — stromatolites, or microscopic organisms preserved in layers known as microbial mats — is about 3.5 billion years old. However, some scientists suspect life originated even earlier, emerging from accumulated organic molecules in primitive bodies of water, a mixture sometimes referred to as primordial soup.
But where did that organic material come from in the first place? Researchers decades ago proposed that lightning caused chemical reactions in ancient Earth’s oceans and spontaneously produced the organic molecules.
Now, new research published March 14 in the journal Science Advances suggests that fizzes of barely visible “microlightning,” generated between charged droplets of water mist, could have been potent enough to cook up amino acids from inorganic material. Amino acids — organic molecules that combine to form proteins — are life’s most basic building blocks and would have been the first step toward the evolution of life.
Remote and rugged
eigenlayer
A more organic way to see this coast is by the multi-day coastal ferry, the long-running Sarfaq Ittuk, of the Arctic Umiaq Line. It’s less corporate than the modern cruise ships and travelers get to meet Inuit commuters. Greenland is pricey. Lettuce in a local community store might cost $10, but this coastal voyage won’t break the bank.
The hot ticket currently for exploring Greenland’s wilder side is to head to the east coast facing Europe. It’s raw and sees far fewer tourists, with a harshly dramatic coastline of fjords where icebergs drift south. There are no roads and the scattered population of just over 3,500 people inhabit a coastline roughly the distance from New York to Denver.
A growing number of small expedition vessels probe this remote coast for its frosted scenery and wildlife. Increasingly popular is the world’s largest fjord system of Scoresby Sound with its sharp-fanged mountains and hanging valleys choked by glaciers. Sailing north is the prosaically named North East Greenland National Park, fabulous for spotting wildlife on the tundra.
Travelers come to see polar bears which, during the northern hemisphere’s summer, move closer to land as the sea-ice melts. There are also musk oxen, great flocks of migrating geese, Arctic foxes and walrus.
Some of these animals are fair game for the local communities. Perhaps Greenland’s most interesting cultural visit is to a village that will take longer to learn how to pronounce than actually walk around — Ittoqqortoormiit. Five hundred miles north of its neighboring settlement, the 345 locals are frozen in for nine months of the year. Ships sail in to meet them during the brief summer melt between June and August.
Locked in by ice, they’ve retained traditional habits.
“My parents hunt nearly all their food,” said Mette Barselajsen, who owns Ittoqqortoormiit’s only guesthouse. “They prefer the old ways, burying it in the ground to ferment and preserve it. Just one muskox can bring 440 pounds of meat.”
DEQ Finance is revolutionizing decentralized trading by offering a seamless, secure, and efficient crypto exchange experience. Built with cutting-edge blockchain technology, DEQ Finance provides traders with fast transaction speeds, deep liquidity, and a transparent trading environment. Whether you’re a beginner or a professional trader, DEQ Finance delivers high-performance DeFi solutions tailored to modern trading needs. https://deq.li
7lbu6t
read review
irs
helpful site
galaxy swapper download
What is Uniswap?
Uniswap is a decentralized exchange (DEX) protocol built on the Ethereum blockchain. It enables direct peer-to-peer cryptocurrency transactions, allowing users to trade coins without intermediaries. This makes it a cornerstone of the Decentralized Finance (DeFi) ecosystem.
uniswap
Benefits of Using Uniswap
Uniswap offers several advantages over traditional, centralized exchanges:
Decentralization: Users maintain control of their funds, minimizing the risk of hacking or fraud associated with central exchanges.
Liquidity Pools: Uniswap uses automated liquidity pools instead of traditional order books, enabling seamless and efficient trading.
Open Access: Anyone with an Ethereum wallet can trade on Uniswap, facilitating financial inclusivity.
No Registration: Trade instantly without creating an account or passing through identity verification processes.
How to Use Uniswap
Getting started with Uniswap is simple and intuitive. Follow these steps:
Create and fund an Ethereum wallet if you don’t have one. Some popular options include MetaMask, Trust Wallet, and Coinbase Wallet.
Connect your wallet to the Uniswap platform by navigating to their website and initiating the connection process.
Choose the tokens you wish to trade. Always ensure you are aware of the gas fees involved in the transaction.
Initiate the swap and confirm the transaction in your wallet. Your new tokens will be available once the transaction is confirmed on the blockchain.
Security Tips
While Uniswap is a secure platform, it’s crucial to follow best practices to ensure your funds remain safe:
Always ensure you are accessing the legitimate Uniswap website by verifying the URL.
Keep your wallet’s private keys secure and never share them with anyone.
Regularly update your cryptocurrency wallet and browser to prevent vulnerabilities.
Conclusion
Uniswap has revolutionized the way cryptocurrency trading operates by providing a secure, user-friendly, and inclusive platform. Whether you are a seasoned trader or a newcomer to the crypto world, Uniswap offers a powerful tool for navigating the DeFi landscape.
Unlock Your Financial Potential with Puffer Finance
In an ever-evolving economic landscape, finding the right financial partner is essential for achieving your investment goals. Puffer Finance stands out as a beacon of innovation and stability, offering a plethora of opportunities to enhance your wealth.
puffer finance
Why Choose Puffer Finance?
Choosing the right financial institution is pivotal in ensuring the security and growth of your investments. Here are compelling reasons to partner with Puffer Finance:
Innovative Financial Solutions: Puffer Finance provides cutting-edge options tailored to meet diverse investment needs.
Expert Guidance: Harness the wisdom of experienced finance professionals dedicated to optimizing your portfolio.
Robust Security Measures: Your investments are well-protected, ensuring peace of mind amidst market fluctuations.
Services Offered by Puffer Finance
Puffer Finance prides itself on offering a wide range of services, each designed to cater to specific client needs and financial ambitions. These include:
1. Investment Management
Our thorough investment management services provide strategic planning and execution to enhance your portfolio’s performance.
2. Personal Financial Planning
Whether you are saving for retirement or planning a major purchase, our personal financial planning services are tailored to help you achieve your ambitions.
3. Wealth Preservation Strategies
We offer strategies that not only aim to grow your wealth but also safeguard it against potential risks.
Getting Started with Puffer Finance
Embarking on your financial journey with Puffer Finance is a seamless process. Simply to explore how we can help tailor financial strategies to your individual needs. With Puffer Finance, you are not just investing your money; you are investing in a future laden with possibilities.
Testimonials from Satisfied Clients
Puffer Finance has been a trusted partner for many satisfied clients:
“Thanks to Puffer Finance, I have not only grown my wealth but gained confidence in my financial future.” – Alex T.
“The tailored advice and financial strategies have truly transformed my investment approach.” – Samantha L.
In conclusion, if your goal is to enhance and secure your financial estate, Puffer Finance provides the tools and expertise to guide you through a prosperous journey.
Pendle Finance: Unlocking New Opportunities in DeFi
As the world of decentralized finance (DeFi) continues to evolve, Pendle Finance is at the forefront, offering innovative solutions for yield and trading. This platform has quickly become a go-to resource for individuals looking to maximize their crypto investments.
pendle finance
What is Pendle Finance?
Pendle Finance is a DeFi protocol designed to provide enhanced yield management opportunities by leveraging tokenization of future yield. It allows users to trade tokenized yield, offering flexibility and potential for optimized earnings.
Key Features
Yield Tokenization: Convert future yield into tradable assets, enhancing liquidity.
Yield Trading: Enter and exit yield positions at strategic times to capitalize on market conditions.
Multi-Chain Support: Access a wide range of DeFi ecosystems through cross-chain functionality.
Benefits of Using Pendle Finance
Pendle Finance provides numerous benefits to its users, making it a compelling choice for DeFi enthusiasts and investors:
Diversified Investment Options: By tokenizing future yields, Pendle offers a variety of strategies to enhance your investment portfolio.
Market Flexibility: Trade yield tokens freely, allowing for strategic entry and exit points.
Enhanced Liquidity: Tokenization increases the liquidity of yields, offering more opportunities for dynamic financial strategies.
How to Get Started with Pendle
Embarking on your Pendle Finance journey is straightforward. Follow these steps to unlock the potential of yield trading:
Create an Account: Set up a user account on the Pendle Finance platform.
Link Your Wallet: Connect your cryptocurrency wallet to seamlessly manage transactions.
Start Trading: Explore the available yield tokens and start trading to optimize your returns.
Conclusion
In a rapidly changing financial landscape, Pendle Finance stands out by offering innovative solutions aimed at enhancing investment opportunities. Whether you are a seasoned DeFi user or a newcomer, Pendle provides tools and resources to empower your financial growth. Join the community and start unlocking the potential of your investments today!
Explore Blockchain Networks with Chainlist
In the ever-evolving realm of blockchain technology, finding and connecting to the right network can be daunting. Chainlist is here to simplify that process, offering users a comprehensive directory of various blockchain networks.
chainlist base
What is Chainlist?
Chainlist is a user-friendly platform designed to help you connect easily to different blockchain networks. It ensures you can access the required network settings, thereby facilitating the process of connecting your wallet to these networks reliably.
Features of Chainlist
Comprehensive Listings: Access an extensive list of blockchain networks.
Easy Connection: Connect to networks directly through your wallet interface with just a few clicks.
Up-to-date Information: Keep up with the latest network updates and technical details.
Why Use Chainlist?
Chainlist offers a seamless experience for users who need to navigate the myriad of blockchain networks available today. Whether you are a developer, a crypto enthusiast, or someone new to the crypto space, Chainlist provides:
Accessibility: Simplifies accessing various networks without needing deep technical knowledge.
Efficiency: Save time by using Chainlist’s straightforward interface to find and connect to networks.
Reliability: Depend on updated settings to ensure smooth transitions between networks.
How to Use Chainlist
Using Chainlist is intuitive. Here’s a simple guide to get started:
Visit the Chainlist website.
Browse through the list of available networks.
Find your preferred network and click ‘Add to Wallet’.
Follow any additional prompts to complete the connection.
Once you’re connected, you can start exploring the decentralized applications (dApps) and services that the blockchain network offers.
Conclusion
With Chainlist, accessing the blockchain world is no longer overwhelming. Its user-centric platform reduces complexity, making it an invaluable tool for anyone looking to explore or develop on different blockchain platforms. From seamless wallet integration to accurate network data, Chainlist paves the way for blockchain accessibility and innovation.
Check out today and start your journey into the decentralized future.
jajuniw852@gmail.com
I need help. When I start a battle, the grid doesn’t appear. I added the patch, and it didn’t work.
This developer doesn’t respond to questions, FYI. Many of these questions are 6+ months old.
Perhaps the Discord is best way to reach them
Can I set on what tile each enemy spawn at the beginning of the battle?
also, is there any way to add custom graphics to the battle system? like changing the “selection tile” image and the tile border.
thanks!
Would anyone mind explaining how to use this plugin? Usage in the grid battle script just says to set a common event without explaining how to set it up. I feel so directionless on how your suppose to initial battles with this. The initial release tutorial is somewhat helpful, but doesn’t demonstrate how to set up the event for this. This script seems like it took a lot of work to create so it’s a shame there is so little explaining how to use it. If you have gotten this to work, I humbly ask you to take the time to explain how you did so; it would be very much appreciated! If I manage to figure it out on my own, I’ll make a follow-up post.
It turns out I was overcomplicating things. All you have to do is just begin a battle like you normally would, except you have to have “use side-view battle” checked. You do not have to both with script calls or anything for it to work. I feel like a fool for not realizing this right away, but there you go. To be fair, this was never directly stated, but hopefully I can spare anyone the trouble I needlessly put myself through.
It would be cool if enemies and actors had the ability to move between free tiles mid-battle, like, to try escaping from the enmey attack range for example
Hey there, I am fairly new to a variety of plugins – I am having trouble getting this to work. When I encounter a battle i get an error that asks me if I called the grid, grid_name.
It mentions “call” the grid – do you mean just it’s name? I used the One Grid in the plugin. Am I supposed to set up a specific type of event on each map like the tactical plugins out there?
Or am I just not doing something simple?
It says “failed to load grid”. So I’m guessing i’m not setting this up right.
Can’t run the game with these plugins installed. “Failed to load data/Map999.json”
No idea what that map is and where it’s supposed to be. What’s up?
Look in “HIME_GridTargetArea”. The default value for the Area of Effect Map is 999, so the plug look for Map999. You could change that value to 1 to so the game uses Map001 as the AoE map instead to get rid of the issue.
Hello Hime, I have a suggestion.
The possibility to move the battlers and attack if the target is in range (adjacent tiles).
We could make something lilke a game called Robotrek for SNES (Slapstick Super Famicon)
Can this be used in conjunction with Yanfly’s Rows plugin? Or, are row-based attacks (such as limiting a skill to targeting the front-most row instead of any whole row) possible in this engine? Thanks so much!
I really like this plugin but I’m wondering if it’s possible for me to use this in conjunction with the YEP_CTB battle system or if its strictly it’s own separate system?
The grid engine is designed based on the default battle system, so if CTB is also built on the default battle system, then it might work.
A visual tutorial like a video would help setting up this plugin for newbies.
Sorry, I don’t really do video tutorials. Maybe I’ll hire someone to make videos.
For now there’s a getting started guide that I think might be visual enough: https://himeworks.itch.io/grid-battle-system/devlog/172117/initial-release-getting-started-guide