[Tutorial Series] Hime ATB #1: Designing a Simple Active Battle System


This is a tutorial series on Active Time Battle System development. In this first part, you will put together a functional battle system that you will continue to build on in later tutorials.
Our goal is to create our own battle system with the ability to enable or disable various options depending on how you would like the battle system to function.
At the end of this tutorial, you will be able to build a super simple ATB that isn’t ready for actual use, but is good enough for video purposes like this!
Specifications
To begin with, we need some idea what an “active time battle” system means. After all, you could have a different idea on what the goal is.
Suppose you have all of your battlers that will be participating in battle. The battle begins, displaying a message indicating that the battle has begun.
The battle then proceeds, where each battlers perform actions, until a battle end condition has been met.
In an “active time battle” system, the order that the battlers can perform actions is based on how much time has passed. Each battler must wait a certain amount of time before they can perform an action. Once a certain amount of time has passed, they will be able to perform an action. After the action is performed, they will proceed to wait again until their next action comes.
This will be the basis of our battle system, one in which time plays a key factor in how the battle proceeds.
Starting off with Simple Battler Actions
Let’s ignore things like states and events for now. In the most basic battle system, all you really need is to have a battler punch another battler until one of them gives up. This represents a complete battle system that can potentially be amusing to use.
Here is the logic:
- Battle Begins
- Battlers punch each other until one side wins
- Battle Ends
Of course, since this is meant to be an active time battle system, we will need to implement some sort of active time mechanic.
The “Active Time Bar”
Suppose you have an actor and an enemy. Who will go first? Who will go second? What is the order after that? We first need to determine what the order of actions will be, and how we will keep track of that order.
An “active time” system requires us to use something as a measure of time. We can use “frames”, since that is how time is tracked by default.
We will use something called an “active time bar” (atb) to keep track of how many frames have passed. Each battler will keep track of an ATB value, which ranges between 0 to some maximum amount that you choose.
Here is the code to set it up:
var TH_GameBattler_initMembers = Game_Battler.prototype.initMembers;
Game_Battler.prototype.initMembers = function() {
   TH_GameBattler_initMembers.call(this);
   this.initAtb();
};
Now all of our battlers have an ATB bar.
ATB Bar Size
For simplicity, let us assume that the bar represents whether the battler is ready to perform an action or not.
When it is “filled up”, the battler is ready to perform an action.
This means that we will need to have a limit on our ATB (otherwise our battler will never be able to perform an action).
Let’s define the ATB max. Let’s go with 100 for now.
Game_Battler.prototype.atbMax = function() {
   return 100;
};
We have now established an ATB that ranges from 0 to 100.
ATB Fill Rate
Now, the bar will “fill” up at a certain rate. We will call this the “fill rate” over time, which means that on every frame, the bar will fill up a certain amount.
The higher the fill rate, the faster a battler will be able to perform an action.
The smaller the fill rate, the slower they will be.
Let us assume for now that all battlers’ atbs fill at a rate of 1 unit per frame.
Game_Battler.prototype.atbFillRate = function() {
  return 1;
};
We will re-visit this in a later tutorial when we focus on implementing mechanics that will alter fill rates.
Updating ATB
Finally, we need a method that will update our battler’s ATB.
Game_Battler.prototype.updateAtb = function() {
  this._atb = Math.min(this._atb + this.atbFillRate(), this.atbMax());
};
This method should be called every frame. Note that I make it so that once the atb has maxed out, it won’t go any higher.
Clearing out ATB
Of course, we will want to clear out our ATB at some point. We can just define such a method
Game_Battler.prototype.clearAtb = function() {
  this._atb = 0;
};
It is important to realize that the `initMembers` method is called when the battler is first created. Actors always exist in the game, so you will actually need to add some logic to the `onBattleStart` method so that the ATB is initialized at the beginning of battle. Since this method already exists, you will also need to alias it
var TH_GameBattler_onBattleStart = Game_Battler.prototype.onBattleStart
Game_Battler.prototype.onBattleStart = function() {
  TH_GameBattler_onBattleStart.call(this);
  this._atb = 0;
};
At this point, you have created an ATB bar for your battlers. But it doesn’t do anything. We will need to integrate it with our battle system.
Implementing the Battle Flow
Now, we will take a look at the BattleManager, which we will use to handle all battle logic.
There are three steps to our battle system (well, for any battle system)
1. Battle Start
2. Battle Processing
3. Battle End
Battle Start is pretty simple: we initialize our ATB as we have done before.
Next, we move into our battle processing, where our battlers will exchange attacks until one side gives up.
This is the logic that we will be looking for:
1. Update frame. This will update all of our battlers’ atb.
2. Check for any battlers that are ready to input.
– If there is a battler ready, start input selection. If it’s an actor, we let the player pick an action. If it’s an enemy, the game will pick an action an move on.
3. When a battler is ready to perform an action, the game will begin to process that battler’s action.
4. When the battler has finished performing the action, their action ends, and their atb will be updated.
This will continue until one side wins.
Let’s start with simply updating the battlers’ atb.
Updating ATB
Let’s take a look at the default battle manager’s update method.
BattleManager.update = function() {
    if (!this.isBusy() && !this.updateEvent()) {
        switch (this._phase) {
        case 'start':
            this.startInput();
            break;
        case 'turn':
            this.updateTurn();
            break;
        case 'action':
            this.updateAction();
            break;
        case 'turnEnd':
            this.updateTurnEnd();
            break;
        case 'battleEnd':
            this.updateBattleEnd();
            break;
        }
    }
};
It divides battle processing into 5 different phases. The “turn” phase is used when the battle is just waiting for things to happen, and is generally called when you’re processing input or actions. The battle also begins with “startInput”, but it is not suitable for us, so let’s just automatically skip to the turn phase.
BattleManager.startInput = function() {
  this._phase = 'turn'
};

BattleManager.updateTurn = function() {
  this.updateFrame();
}

BattleManager.updateFrame = function() {
  $gameParty.updateFrame();
  $gameTroop.updateFrame();
};

Game_Unit.prototype.updateFrame = function() {
  var members = this.members();
  for (var i = 0; i < members.length; i++) {
    members[i].updateFrame();
  }
};

Game_Battler.prototype.updateFrame = function() {
  this.updateAtb();
};
Now, on every update, our battlers will update their atb’s.
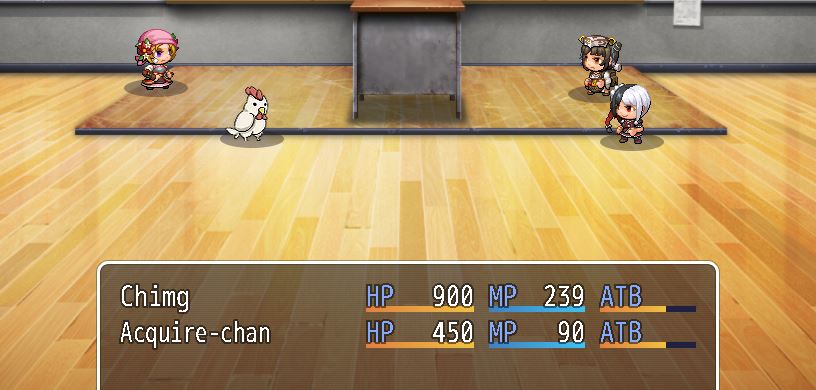
Visualizing the ATB
It would be nice to see our ATB fill up so that we can see that it works.
Let’s add a simple bar to our window. We’ll replace the TP bar for now
Window_BattleStatus.prototype.drawActorAtb =  function(actor, x, y, width) {
  width = width || 186;
  var atb = actor.atb();
  var atbMax = actor.atbMax();
  var color1 = this.hpGaugeColor1();
  var color2 = this.hpGaugeColor2();
  this.drawGauge(x, y, width, atb / atbMax, color1, color2);
  this.changeTextColor(this.systemColor());
  this.drawText("ATB", x, y, 44);
};

Window_BattleStatus.prototype.drawGaugeAreaWithTp = function(rect, actor) {
  this.drawActorHp(actor, rect.x + 0, rect.y, 108);
  this.drawActorMp(actor, rect.x + 123, rect.y, 96);
  this.drawActorAtb(actor, rect.x + 234, rect.y, 96);
};

var TH_WindowBattleStatus_update = Window_BattleStatus.prototype.update;
Window_BattleStatus.prototype.update = function() {
  TH_WindowBattleStatus_update.call(this);
  this.refresh();
}
It’s not actually a good idea to redraw all of the graphics every frame, but this is just for testing purposes.
Now we can see our ATB fill up! I find this more satisfying than simply seeing some numbers in the console.
Handling Battler Input
Now that our ATB works, we want to be able to do something when it fills up.
There are a few ways to do it
1. After updating all of the frames, go and check whether any battlers are currently “ready” to input.
2. Have each battler tell the battle manager that they’re ready.
Which one should we choose?
This is mostly a design decision: if it’s the battler’s job to tell the battle manager that they’re ready to go, then go with option 2. Otherwise, if it’s the battle manager’s job to figure that out, go with option 1.
There isn’t really a right answer. In terms of computation, since we’re updating all battlers anyways, it might make sense to have each battler indicate that they’re ready. But for now we’ll go with option 1.
Here’s how it might look if we wanted to check for any ready battlers.
BattleManager.updateFrame = function() {
  var members = this.allBattleMembers();
  for (var i = 0; i < members.length; i++) {
    if (members[i].canInput()) {
      this._subject = members[i];
      this.startInput();
      break;
    }
  }
  if (!this._subject) {
    $gameParty.updateFrame();
    $gameTroop.updateFrame();
  }
}
So on every frame update, I would check if there are any battlers ready to go.
If one is found, I enter the input phase. If not, all battlers will have their frames updated.
Earlier, we had our startInput method do nothing but skip to the turn phase. We’ll need to actually write something now.
BattleManager.startInput = function() {
  if (this._subject) {
    this._subject.makeActions();
    if (this._subject.isActor() && this._subject.canInput()) {
      this._phase = 'input'
    }
  }
  else {
    this._phase = 'turn'
  }
};
The logic is a bit hardcoded for now, but basically if there’s a battler currently available, we enter the input phase. If it’s an actor and that actor can input, then we have the game wait while the player selects an input. Otherwise, we just continue our ‘turn’ phase.
Processing an Action
If you playtest your code so far, when an actor’s ATB fills up, you can pick an action. However, once you pick an action, you’ll be asked to pick an action again.
Why does this happen? Well, remember that your `updateTurn` method simply updates the frame.
BattleManager.updateTurn = function() {
  this.updateFrame();
}
And since we have a battler that can input, it will just keep picking that same battler.
After we have picked an action, we would like to perform it. And once all actions have been performed, we would like to end that battler’s action.
Here’s how you might do it:
BattleManager.updateTurn = function() {
  if (this._subject) {
    if (this._subject.currentAction()) {
      this.processTurn();
    }
    else {
      this.endSubjectTurn();
    }
  }
  else {
    this.updateFrame();
  }
};

BattleManager.endSubjectTurn = function() {
  this._subject.clearAtb()
  this._subject = null;
};
So if we have a battler that’s currently selected, and an action has been selected, then we perform that action. Otherwise, we will end the battler’s turn, which involves clearing the atb and removing the battler from selection so that the battle manager can resume updating atb’s.
We will need a few extra pieces of code:
BattleManager.actor = function() {
  return this._subject;
};

BattleManager.selectNextCommand = function() {
  this._phase = 'turn';
};

BattleManager.selectPreviousCommand = function() {
  this._phase = 'turn';
};
These are mainly for compatibility purposes, because the default Scene_Battle uses these methods. The first method is used to get the current actor that is inputting an action, while the next two methods are used after you have selected a command. Since it is up to the battle manager to figure out who can perform an action, we just change the phase back to “turn”.
Now, we have a simple atb system! If you’ve followed along, things should work.
Otherwise, here’s the code that you can reference.
Feedback
Do you have any questions or comments? Perhaps there is something that is unclear, or could be implemented in a better way? Let me know in the comments!
Share the Tutorial
If you know anyone that is interested in writing battle systems for RPG Maker, share this with them!
You can also follow me on Twitter, Facebook, or Youtube for the latest posts and videos.
Support HimeWorks
If you would like to support me in writing these tutorials, you can put in a monthly pledge on Patreon! Every little bit helps, and becoming a supporter allows you to gain access to some exclusive content like development logs/rants, closed beta tests, and other things that I offer.