Introducing Diagonal Movement into RPG Maker
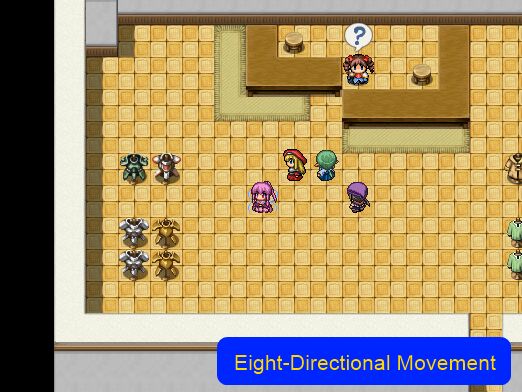
This article explains how to introduce diagonal movement into RPG Maker. By default, RPG Maker assumes characters can only face four directions. Although there is support for eight directions, it is not implemented.
We start by seeing how we can turn our four-directional movement into eight-directional movement.
Direction Numbers
RPG Maker uses numbers to represent each direction.
1 - down-left
2 - down
3 - down-right
4 - left
6 - right
7 - up left
8 - up
9 - up right
If you have a keyboard with a numpad, you might notice the directions correspond to the layout, with 5 in the center.
Handling Direction Input
RPG Maker provides two ways to check your direction.
- Input.dir4. This returns the number corresponding to 4-directional movement.
- Input.dir8. This returns the number corresponding to 8-directional movement.
When you press one key, it will be a 4-dir move. When you hold down two keys, the game will automatically find which two keys you’re pressing and calculate the appropriate direction value.
Note that if you hold two keys and use dir4, the game will simply round it off to one of the 4-dir directions.
Performing Diagonal Movement
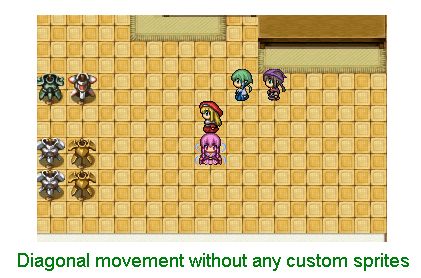
RPG Maker already supports diagonal movement. They come with the move route editor. This means that most of the work is done for you: all we need to do is call it.
Here is the signature for diagonal movement, defined in Game_Character
#--------------------------------------------------------------------------
# * Move Diagonally
#     horz:  Horizontal (4 or 6)
#     vert:  Vertical (2 or 8)
#--------------------------------------------------------------------------
def move_diagonal(horz, vert)
Player Movement
One of the easiest places to start is converting the player’s 4-dir movement into 8-dir movement. Going through the scripts, we see that movement input is handled like this
def move_by_input
  return if !movable? || $game_map.interpreter.running?
  move_straight(Input.dir4) if Input.dir4 > 0
end
There are some conditions that prevent you from moving, but other than that, if you press any of the direction keys, you will move straight in that direction.
Instead of working with 8 directions directly, you instead pass in the orthogonal movement for each axis. So let’s rewrite the move_by_input method as follows
def move_by_input
  return if !movable? || $game_map.interpreter.running?
  return if Input.dir4 == 0
  return move_straight(Input.dir4) if Input.dir8 % 2 == 0
  case Input.dir8
  when 1
    return move_diagonal(4, 2)
  when 3
    return move_diagonal(6, 2)
  when 7
    return move_diagonal(4, 8)
  when 9
    return move_diagonal(6, 8)
  end
end
Instead of using 8 different cases, I simply checked if it was even or not. If it’s even, then it’s one of the orthogonal movements. If it’s odd, then it’s diagonal movement.
At this point, you can test your game and see that you do move diagonally.
Updating Character Direction
When the character is moving diagonally, you want to properly update the character’s direction. This is how the method is defined by default
def move_diagonal(horz, vert)
  @move_succeed = diagonal_passable?(x, y, horz, vert)
  if @move_succeed
    @x = $game_map.round_x_with_direction(@x, horz)
    @y = $game_map.round_y_with_direction(@y, vert)
    @real_x = $game_map.x_with_direction(@x, reverse_dir(horz))
    @real_y = $game_map.y_with_direction(@y, reverse_dir(vert))
    increase_steps
  end
  set_direction(horz) if @direction == reverse_dir(horz)
  set_direction(vert) if @direction == reverse_dir(vert)
end
Because the default engine uses 4-dir movement, all directions are stored in four directions. You can see that it simply picks one of the orthogonal directions. If we are changing to 8-dir movement, we can now store our actual diagonal value in the direction. For compatibility purposes, I decide to take the long way around:
class Game_CharacterBase
  alias :th_8dir_movement_move_diagonal :move_diagonal
  def move_diagonal(horz, vert)
    th_8dir_movement_move_diagonal(horz, vert)
    if horz == 4
      if vert == 2
        set_direction(1)
      elsif vert == 8
        set_direction(7)
      end
    elsif horz == 6
      if vert == 2
        set_direction(3)
      elsif vert == 8
        set_direction(9)
      end
    end
  end
end
Inserting Diagonal Sprites
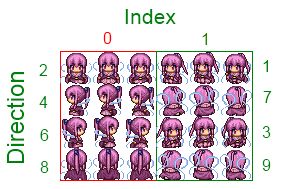
Your diagonal movement works, but it doesn’t look very good. Let’s use some diagonal sprites. I grab some Kaduki Sprites and put them together like this
For convenience, I stick with Ace’s 8 groups per sheet format and place the diagonal sprites right beside the orthogonal sprites.
Now if you just stick this in your project and assign it to your actor, it won’t work, because the engine doesn’t know how to use it.
How Movement Sprites Work
We need to understand how the engine figures out which sprite to draw. The answer lies in Sprite_Character
def update_src_rect
  if @tile_id == 0
    index = @character.character_index
    pattern = @character.pattern < 3 ? @character.pattern : 1
    sx = (index % 4 * 3 + pattern) * @cw
    sy = (index / 4 * 4 + (@character.direction - 2) / 2) * @ch
    self.src_rect.set(sx, sy, @cw, @ch)
  end
end
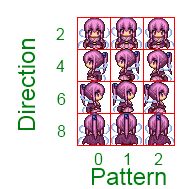
There are a lot of different properties being used. See this diagram:
- Index – Which block of sprites to use
- Pattern – frame in the animation
- Direction – character’s current direction
Recall that in Ace, you can have 8 blocks of character sprites per sheet. This is what the index is for. The math is used to take all of those values and figure out which region on the spritesheet should the sprite be copied from.
Spritesheet Format
We need to decide on a format to use for our spritesheets. Once we have chosen a format, every movement spritesheet must follow that format. For simplicity, let’s just place them side-by-side, since that’s what the sheet I found comes with.
We have something like this
So basically, we have our orthogonal movement as index 0, and our diagonal movement as index 1. Now the question is how all of the calculations from above can be used to figure out whether we want to use orthogonal or diagonal, and which is direction to use.
Math Tricks
We notice a relationship between the orthogonal movement and diagonal movement.
For directions 1 and 2, we use the top row.
For directions 4 and 7, we use the second row.
For directions 6 and 3, we use the third row.
For directions 8 and 9, we use the fourth row.
Now, there is an easy way to calculate this. We use the follow formula
for even dir, use dir
for odd dir, use dir * 2 % 10
So when we are moving in direction 7, the row to use is equal to 7 * 2 % 10 = 4, and so when the engine sees 4, it will know to pick the second row.
This math isn’t really necessary. You could just as easily use a set of conditional branches.
Updating the Sprite or the Character?
At this point, you as the scripter have to make some more decisions. We know that we need to update the index and the direction, but there are two places where this can be done.
- `Game_Character` – these objects stores all of the properties
- `Sprite_Character` – these objects take the characters and draw them
In Game_Character, the direction is set whenever you move. This value should accurately reflect the character’s direction, in case you need to use the direction for other purposes (and there are quite a few cases where we actually need a character’s direction)
I would prefer to modify the sprite method. As mentioned above, we need to handle the orthogonal and diagonal cases separately, so I simply overwrote the method completely:
class Sprite_Character < Sprite_Base
  def update_src_rect
    if @tile_id == 0
      if @character.direction % 2 == 0
        index = @character.character_index
        pattern = @character.pattern < 3 ? @character.pattern : 1
        sx = (index % 4 * 3 + pattern) * @cw
        sy = (index / 4 * 4 + (@character.direction - 2) / 2) * @ch
        self.src_rect.set(sx, sy, @cw, @ch)
      else
        index = @character.character_index + 1  # add one, as per the specs
        pattern = @character.pattern < 3 ? @character.pattern : 1
        sx = (index % 4 * 3 + pattern) * @cw
        sy = (index / 4 * 4 + (((@character.direction * 2) % 10) - 1) / 2) * @ch # our new formula
        self.src_rect.set(sx, sy, @cw, @ch)
      end
    end
  end
end
Now that we have updated the character’s direction to reflect 8-dir, and the sprite knows how to render the character, we should have a pretty good 8-dir movement behavior.
Other Character Objects
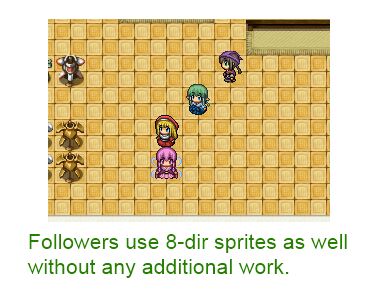
The player is only one type of character. We also have events, followers and vehicles. However, because they all use the same methods that we have customized, they will automatically support proper 8-dir movement as well!
Triggering Events
One thing you will immediately notice is that you can’t trigger events diagonally. I will cover this topic in a later tutorial, where we look at how a simple direction affects whether an event is triggered or not.
Recap
The purpose of this tutorial was to demonstrate how you can implement 8-dir movement in your game. Basically
- Modify the player input to support 8 directional input
- Store the player’s direction
- Update the sprite to use the new format
This can be done in any number of ways. I have shown one way, but it may not be the most optimal or compatible way. A copy of the script can be found here.
Moving Forward
While we have successfully introduced diagonal sprites, we have revealed issues with other aspects of the engine. Because the engine assumed everything was 4-dir, all of the logic involving character direction is based on this assumption. There are still several other things to cover before we have a fully functioning 8-dir movement script.
Credits
All of the sprites shown in the screenshots are taken from this website: http://usui.moo.jp/rpg_chadot.html
Spread the Word
If you liked the post and feel that others could benefit from it, consider tweeting it or sharing it on whichever social media channels that you use. You can also follow @HimeWorks on Twitter or like my Facebook page to get the latest updates or suggest topics that you would like to read about.





When I try to download this plugin it appears blank in the editor. Any way to fix this?
Thank you SO MUCH for this!
I see you don’t monetize your blog, don’t waste your traffic, you can earn additional cash every month.
You can use the best adsense alternative for any type of website (they
approve all websites), for more details simply search in gooogle: boorfe’s tips monetize your website
I see you don’t monetize your page, don’t waste your traffic,
you can earn additional bucks every month because you’ve got high quality content.
If you want to know how to make extra $$$, search for: Ercannou’s essential adsense alternative
Yesterday, I got this working up until the part where you insert the custom sprites, and I messed my game up pretty badly. I fixed it and tried to give it another go today. I got up until the “def move_by_input” part (so, basically, I got nothing done) where I replaced what was there with what you made, and it gave me an error. Something about “expecting keyword end, got $end” or something like that. What did I do wrong?
It’s a syntax error. You might be missing a closing bracket, or an end quote, or something.
Ah, okay, thanks. I’ll try to work it out.
Okay, I got past that part, you were correct, but got stuck on the next part. Got error “undefined method ‘th_8dir_movement_move_diagonal’ for #” Guessing it has to do with “alias :th_8dir_movement_move_diagonal :move_diagonal” but when I kept that in I got error “undefined method ‘move_diagonal’ for class Game_characterbase”. I also tried to move the “alias” part UNDER “def_movediagonal” but I got an error saying “stack level too deep”.
(I know, I’m hopeless. I have no coding experience :T )
The alias defined a new method called
th_8dir_movement_move_diagonalwhich is defined to be whatevermove_diagonaldoes at the time of aliasing. The class name isGame_CharacterBase, so if you defined your own class calledGame_characterbase, you are basically creating a new class instead of working with the existing one.Alright, that makes sense. So the alias basically made it so th_8dir_movement_move_diagonal does the same thing as move_diagonal. So where do I put the alias? Also, could I potentially replace all instances of th_8dir_movement_move_diagonal with move_diagonal or would that not work at all?
By the way, thank you so much for helping me.
You can define them anywhere. Aliasing is just like any other line of code.
The reason why aliasing is done is so when you make modifications to existing methods, you can still call upon the old logic so you don’t completely replace them.
It would be more useful to experiment with aliasing in a separate script to understand what it’s doing.
Oh, okay, I think I understand now. But no matter where I put the alias line, I get some sort of error (“stack too deep”, “undefined method”, “expecting ‘end'” stuff like that).
Where and how would I experiment with aliasing?
It would be easier to download and install ruby directly and look for a ruby IDE to play around with.
Hime,
Thanks for providing such comprehensive explanations for your many scripts.
I can’t seem to get diagonal movement to work in VX Ace. For starters, the diagonal movement signature (“def move_diagonal(horz, vert)”) is in Game_CharacterBase for me, not Game_Character. Is this a versioning issue? Regardless, I’ve tried to include your scripts in Game_Character and Game_Player but I’m still stuck with four directions of movement. I don’t see a core script requirement for this one, but did I not look close enough?
Thanks for the scripts!
~glasfen
It is in
Game_CharacterBase, butGame_Characterwould simply inherit it so it shouldn’t be too much of an issue.This tutorial allows you to implement diagonal movement from a default project. Have you tried the full eight-dir movement script directly to see if it is the way you’ve implemented it?
Thanks for the reply!
I took a look at your scripts again and found that it was an input error on my end. Simple mistake, so sorry to post about it!
I’m interested in eight-direction movement with isometric maps, so I’m going to try your script with MGC ISO Engine. Also, I know that Victor has a script for pixel (non-grid) movement that I’d also like to include. Any thoughts on these?
Thanks again!
I did not test with victor’s script but I have tried Quasi’s pixel movement and it worked with very little modifications (mainly just setting “diagonal movement” to true)
Thanks, Hime! That is very helpful and exactly what I’ve been trying to find for quite a while!
The reason I take interest in diagonal movement is because I take an interest in the idea of isometric parallaxing and what it has to offer in reward for hard work, as there isn’t much you can show using the regular default 2D rpgmaker view. Something however is a concern is the way that the maps come out when you make them match the axis of diagonal movement, yet when you try less harsh of angles, the character ends up running into the wall, all in like this diagram: https://drive.google.com/file/d/0B9oxIE0LXB7cS2ppbTBjdkVidXM/view?usp=sharing
Do you have any suggestions? I’m basically just trying to see what’s best in order to accomplish something that’s visually revealing.
is there a way to make i t so key 7 on keyboard num pad would make u go up left like keys 4 and 8 together would do
You would need to find a script that will allow you to bind numpad keys because RPG Maker doesn’t support them by default.
ok thanks for quick reply !!
and thanks for the awesome scripts !
DO we edit scripts in operating sys scripts?
or is there a script?
I dont see download for script??
nm i found the script and later figured out how to make the sprite…thanks…is there a way to make it so it use 2 dif running sprite sheet for when character is in run mode?
Whenever i try this my game just comes with this error
Script ‘Game_CharacterBase’ line 431: NameError occurred.
undefined method ‘move_diagonal’ for class ‘Game_CharacterBase’
Can you help me figuring out how to fix it?
When the player attempts to make an impossible diagonal movement, the character stops, instead of say, you’ve got trees on either side left and right of you and you’re trying to move diagonally left-down so the character instead moves down only.
Do you think it would be better that way? Or do you prefer the movement process this script uses?
That would be more intuitive to me, since most of the games that support diagonal movement behave like that.